Workspace, settings & billing
Connect an AI assistant
Before you start
Before you start:
- AI assistants must be switched on for your workspace by the OroMiQ team. If there is no AI assistants card in Settings → Integrations, they are not on yet: raise a support request to ask,
- you need an assistant that can add a custom connector or MCP server. The sections at the end of this guide say what each one needs, and
- a workspace admin can pause assistants or limit what they see. If something is withheld, the sign-in screen tells you.
Copy the server address
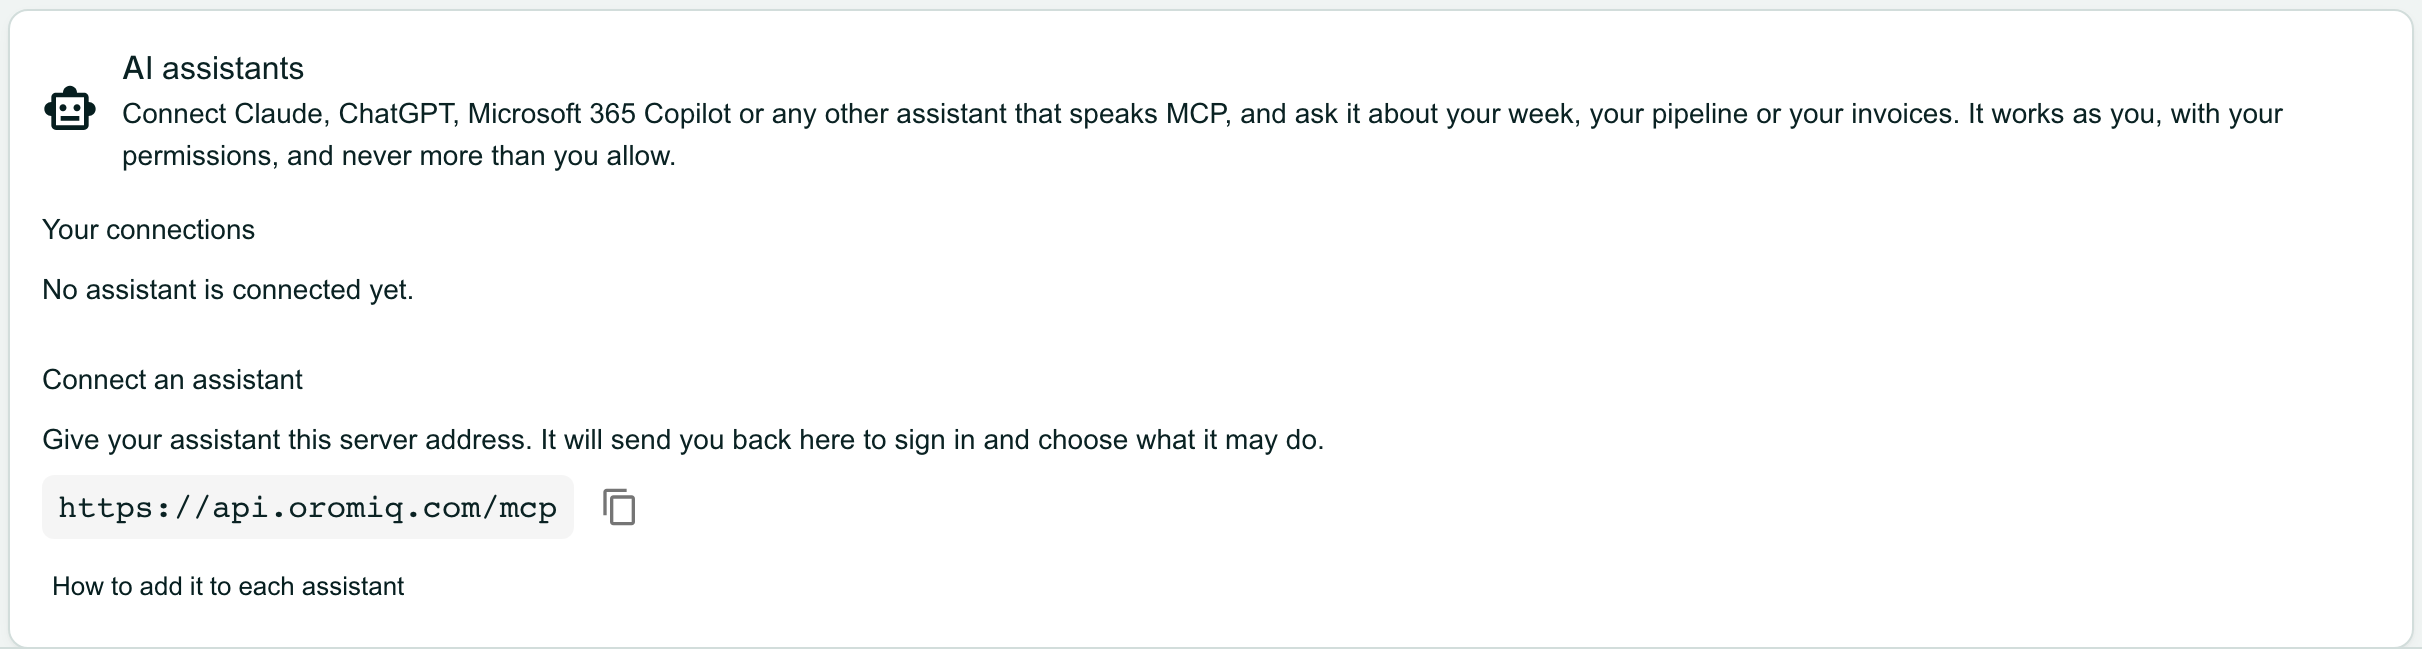
In the sidebar, open Settings then Integrations, and scroll to the AI assistants card. Under Connect an assistant, click the copy button beside the server address.
The address is the same for every assistant. You paste it into your assistant in the next step.
Add OroMiQ to your assistant
Paste the address where your assistant adds a custom connector or MCP server. The steps for Claude, Claude Code, ChatGPT and Microsoft 365 Copilot are at the end of this guide.
When the assistant connects, it opens OroMiQ in your browser. If you are not signed in, sign in as usual, with your two-step verification if you use it.
Check what the assistant asks for, then allow it
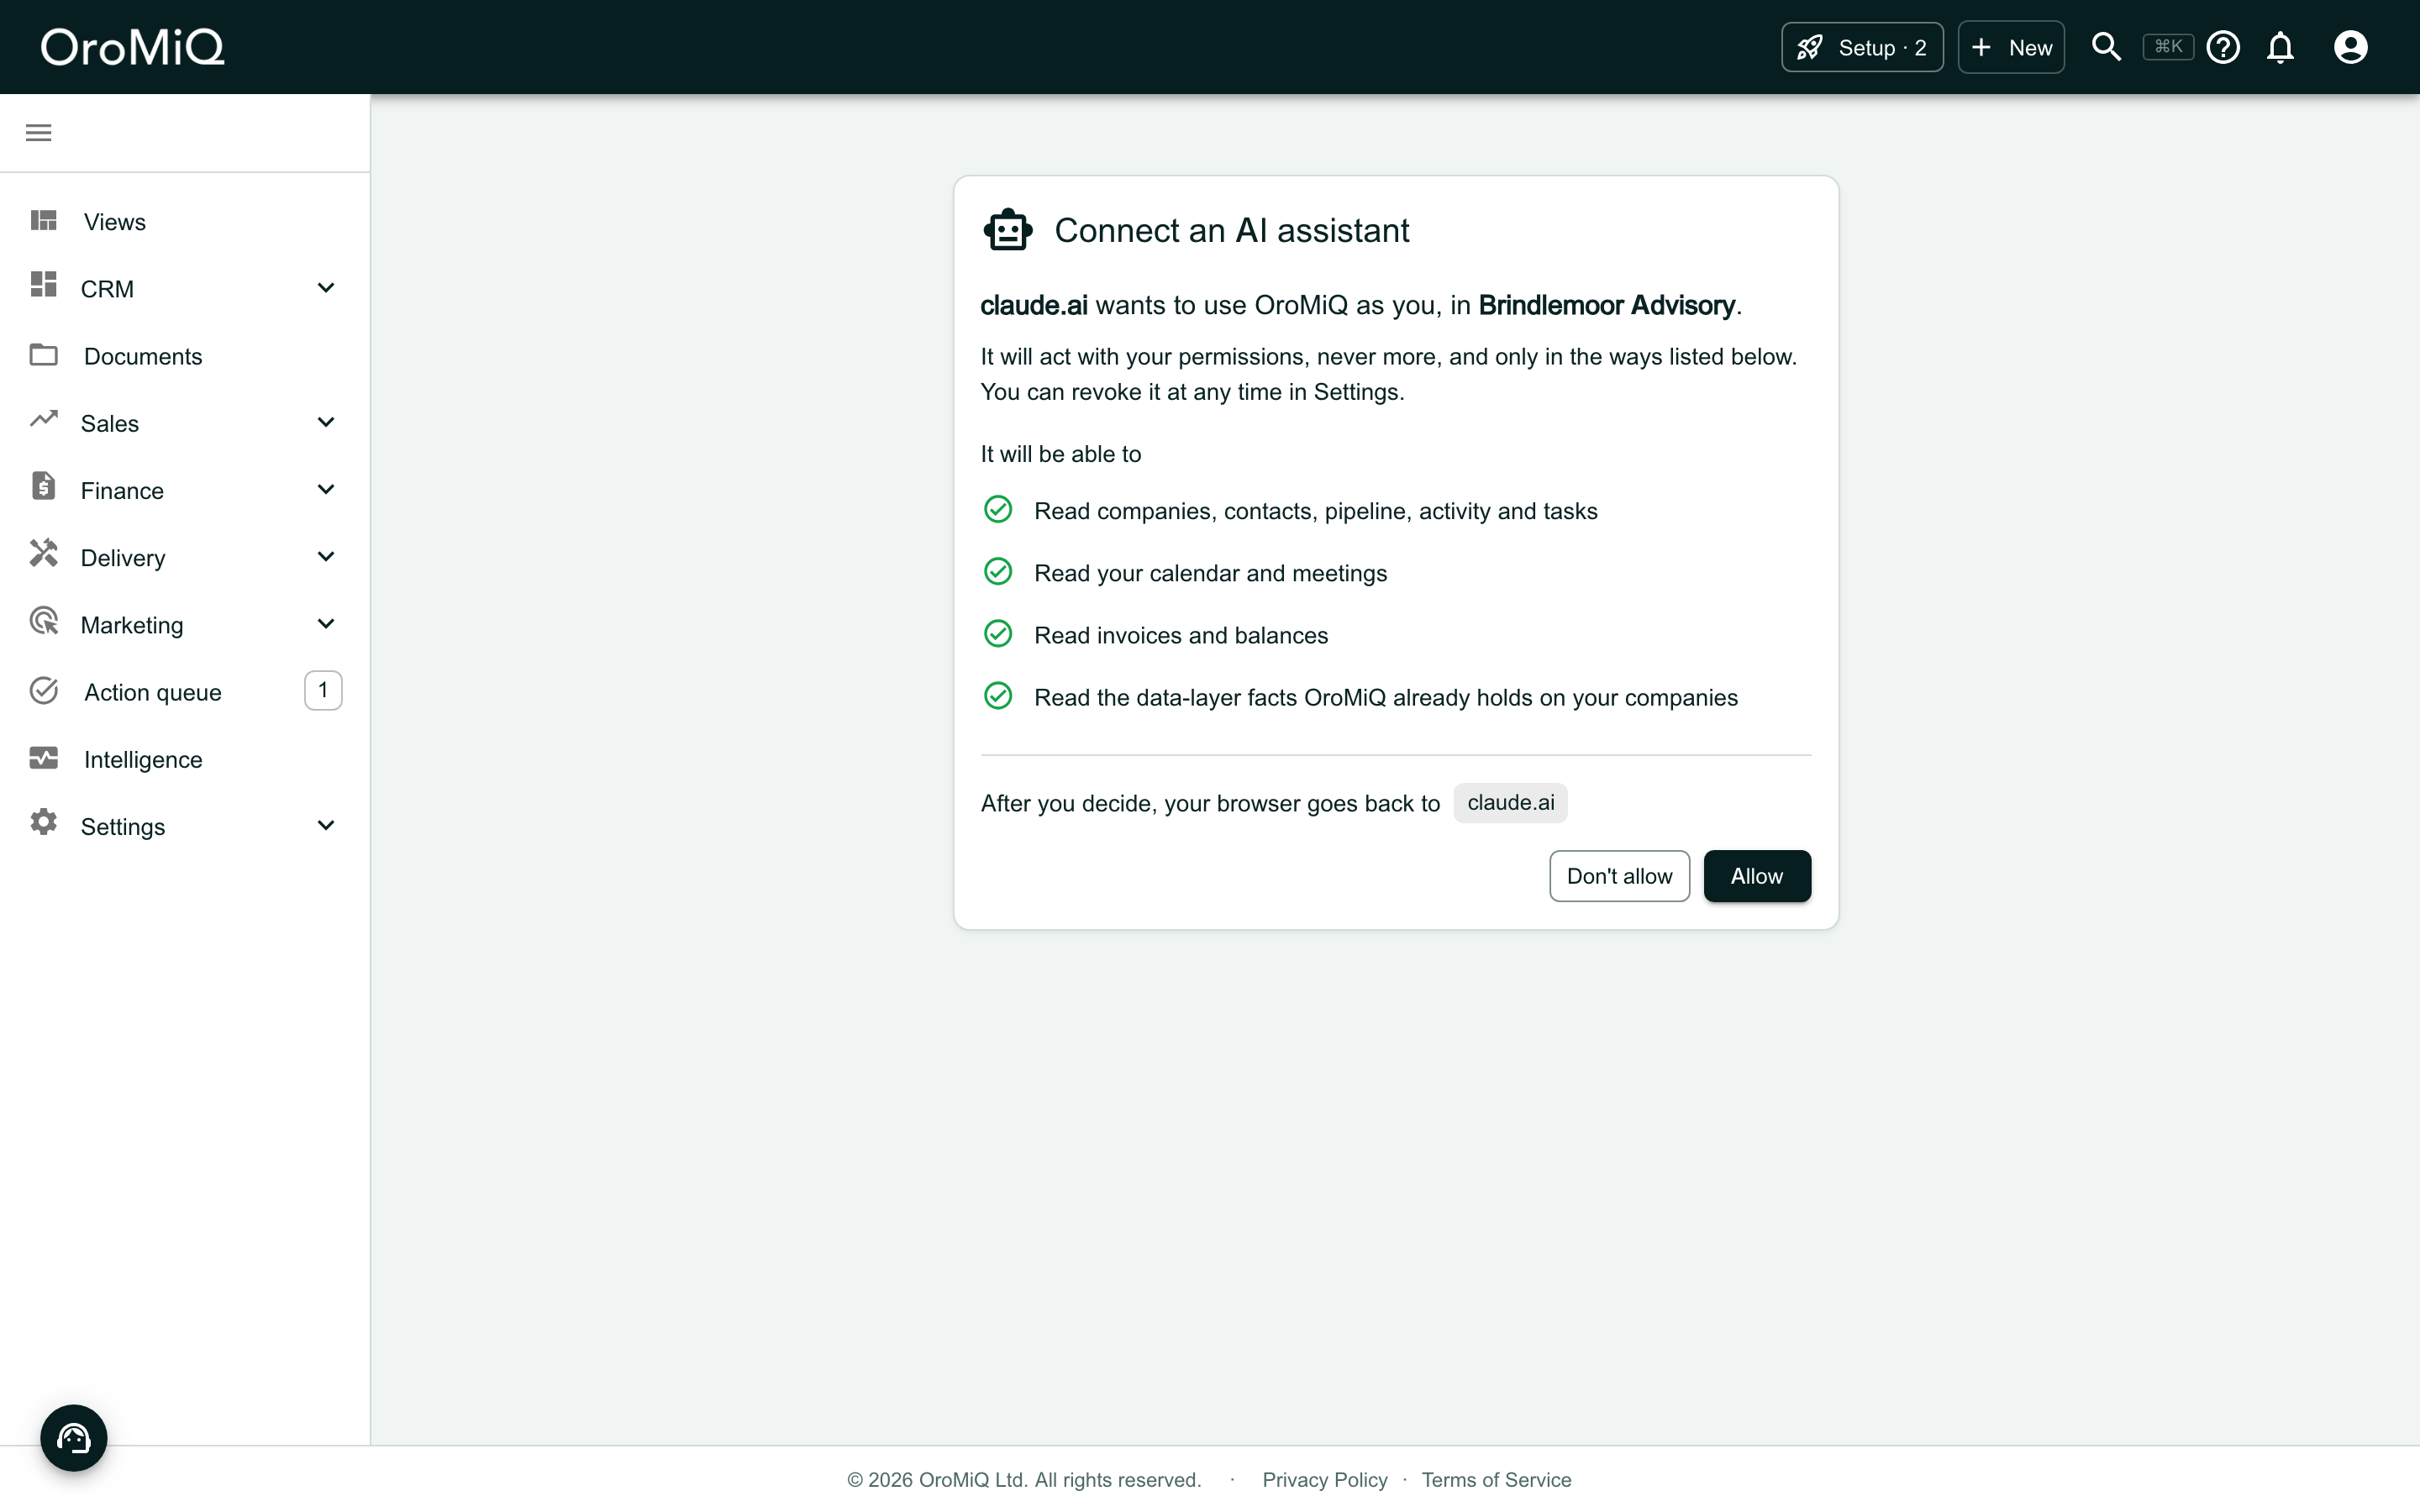
The Connect an AI assistant screen tells you what you are agreeing to. Read it before you decide:
- the assistant, by its web address (such as claude.ai), never by a name it gives itself,
- the workspace it will work in,
- under It will be able to, what it may do, in plain words, and
- beside After you decide, your browser goes back to, where your browser is sent next.
Click Allow to connect, or Don’t allow to refuse. Your browser goes back to the assistant either way.
Note
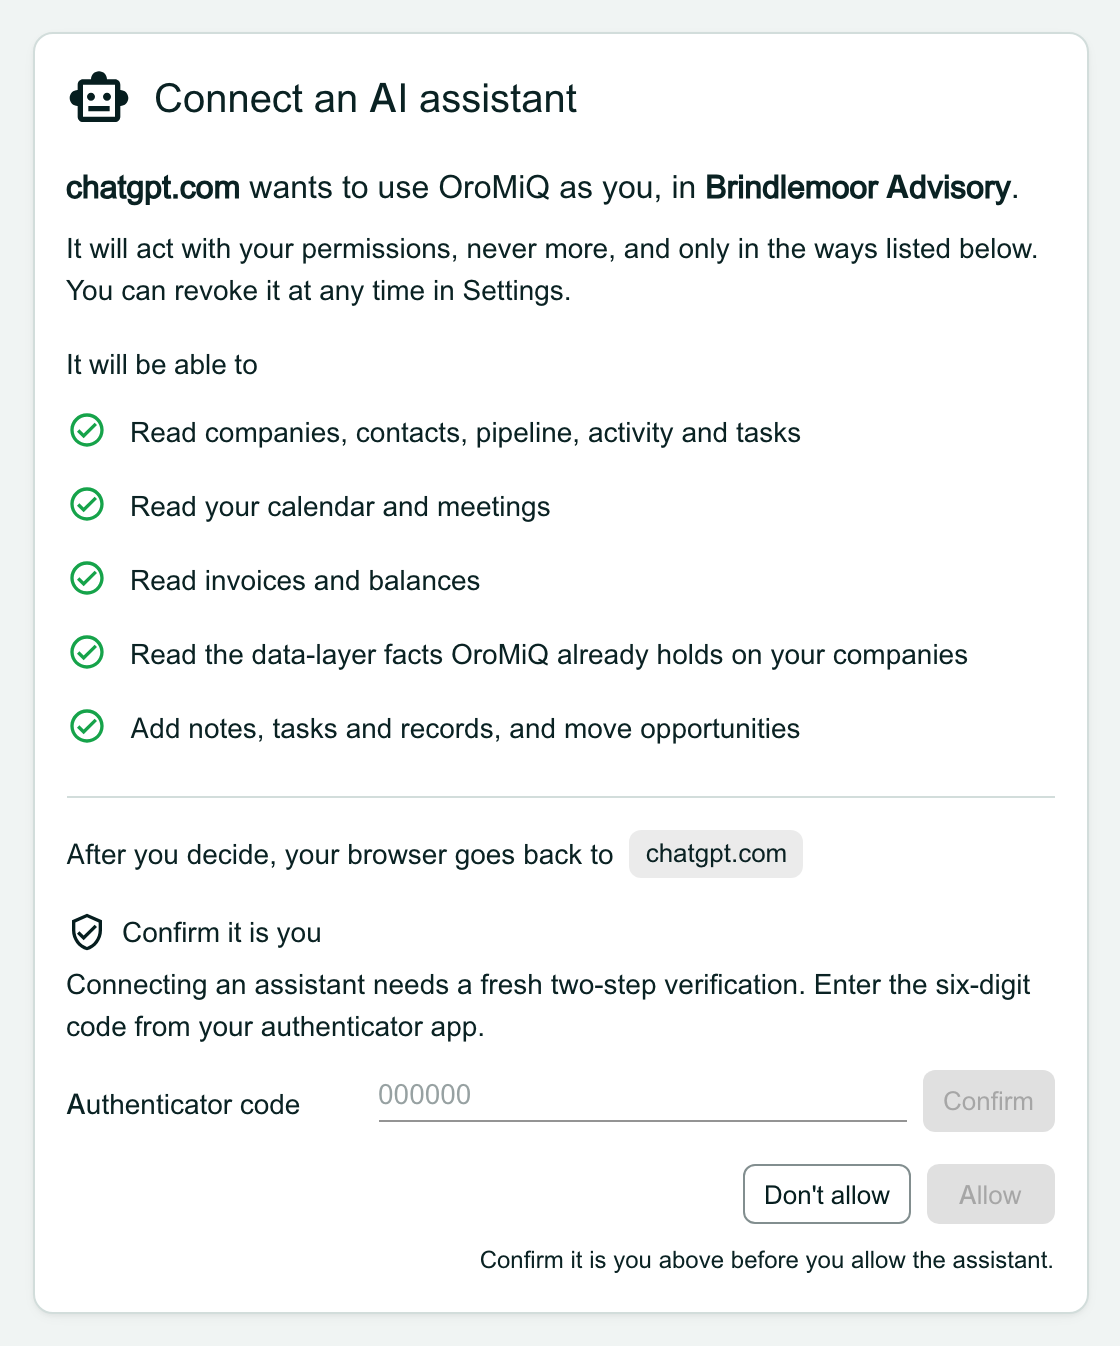
Confirm it is you
The screen shows Confirm it is you. If your account uses two-step verification, enter the six-digit code from your authenticator app and click Confirm, or click Use a passkey if you have one. If it does not, enter your password and click Confirm. Then click Allow.
You confirm every new connection, even if you signed in with two-step verification a moment ago. Allow stays greyed out until you have.
Tip
Ask it something
Go back to your assistant and ask in your own words, for example:
- “What should I work on this week?”
- “Tell me about the company I’m meeting on Thursday: who we know there and where the deal stands.”
- “Who owes us money?”
- “I’ve just come off a call with Priya. Add a note to her company.”
There is no fixed list of questions. The assistant reads your companies, contacts, pipeline, tasks, calendar and, if your workspace uses Finance, your invoices, then answers.
Once you allow changes, it can also add notes, log calls and meetings, add and complete tasks, add and update companies and contacts, add opportunities with products on them, update them and move companies between pipeline stages, add calendar events, keep your product catalogue, put a chart from a data layer on one of your dashboards, and check a list of companies and contacts with you before importing it. If your workspace has a data layer, a column of register identifiers in that list (company numbers, say) is matched the way Bulk import matches it: the assistant tells you how many matched, how many companies it would create from their records and what that costs in tokens, and asks before it goes ahead. It cannot delete anything, send email or issue invoices.
Read before you confirm
Where your data goes
See your connections
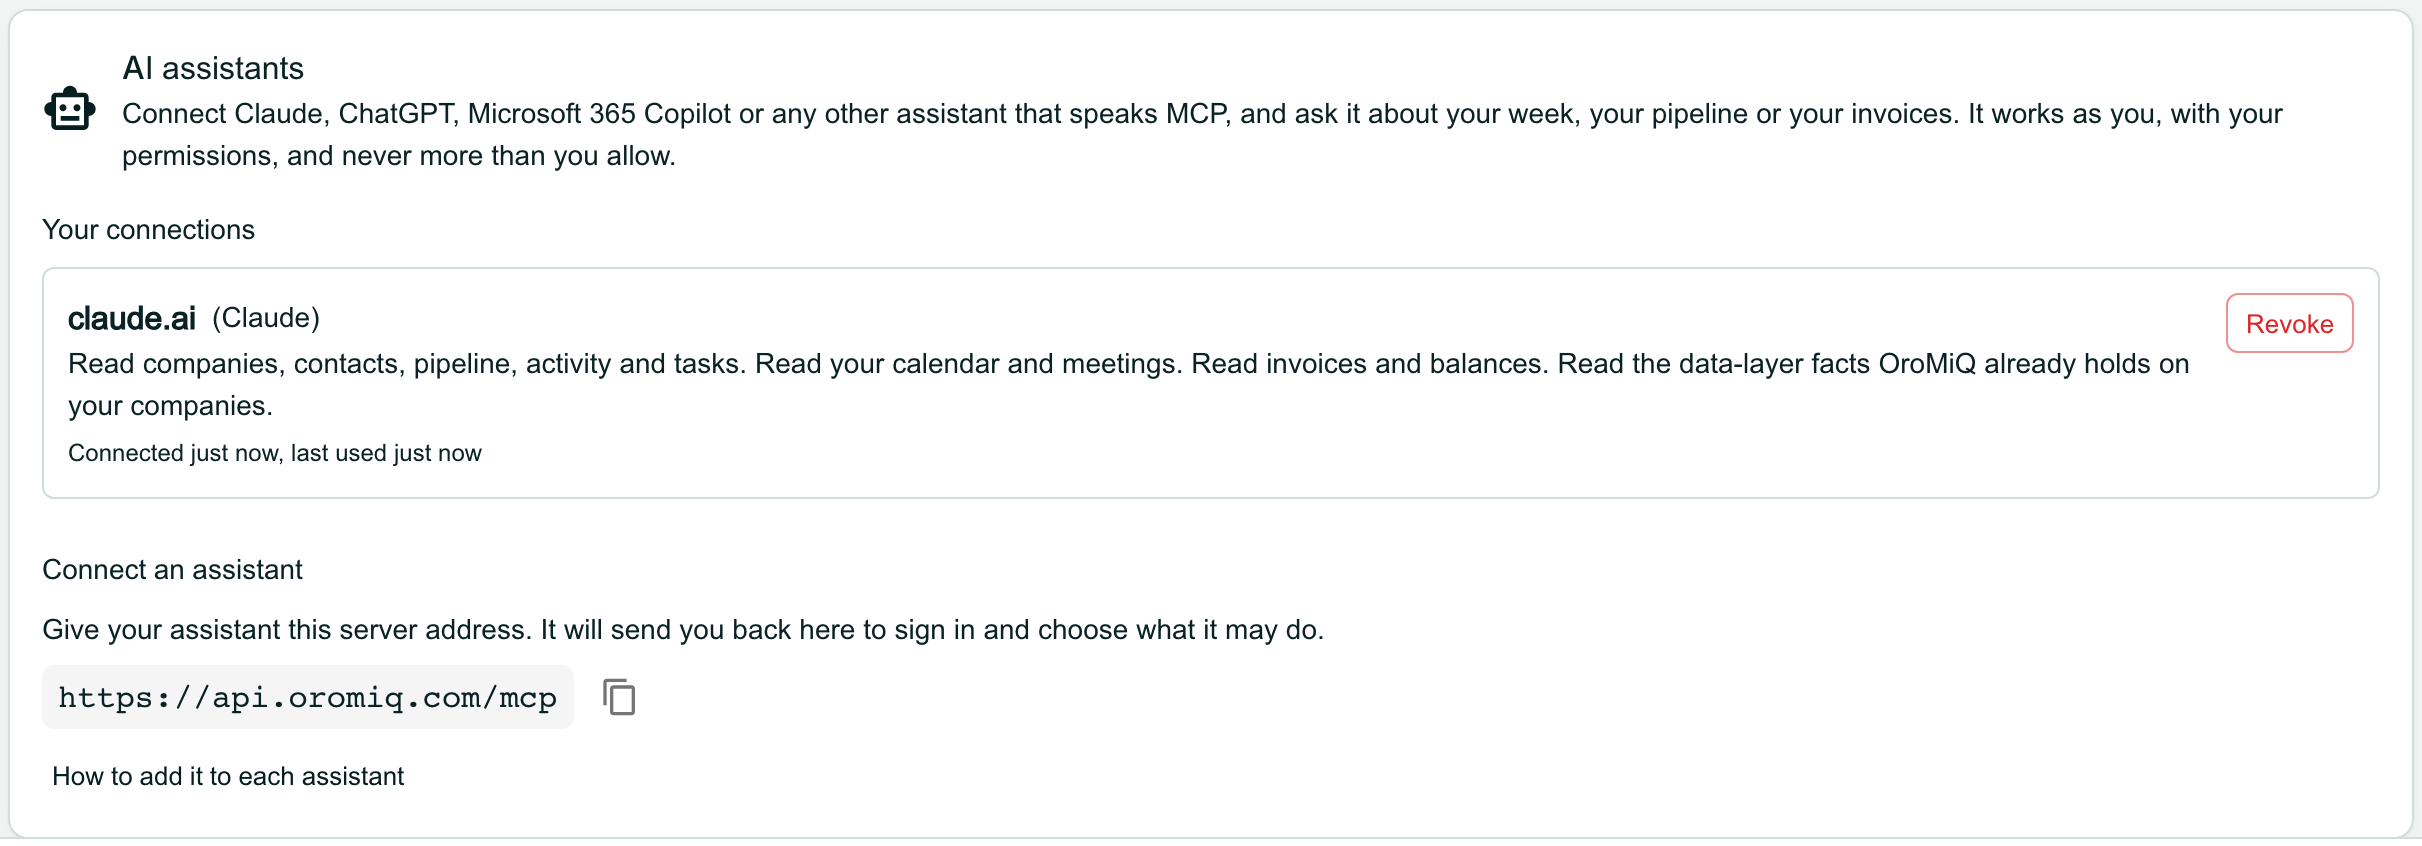
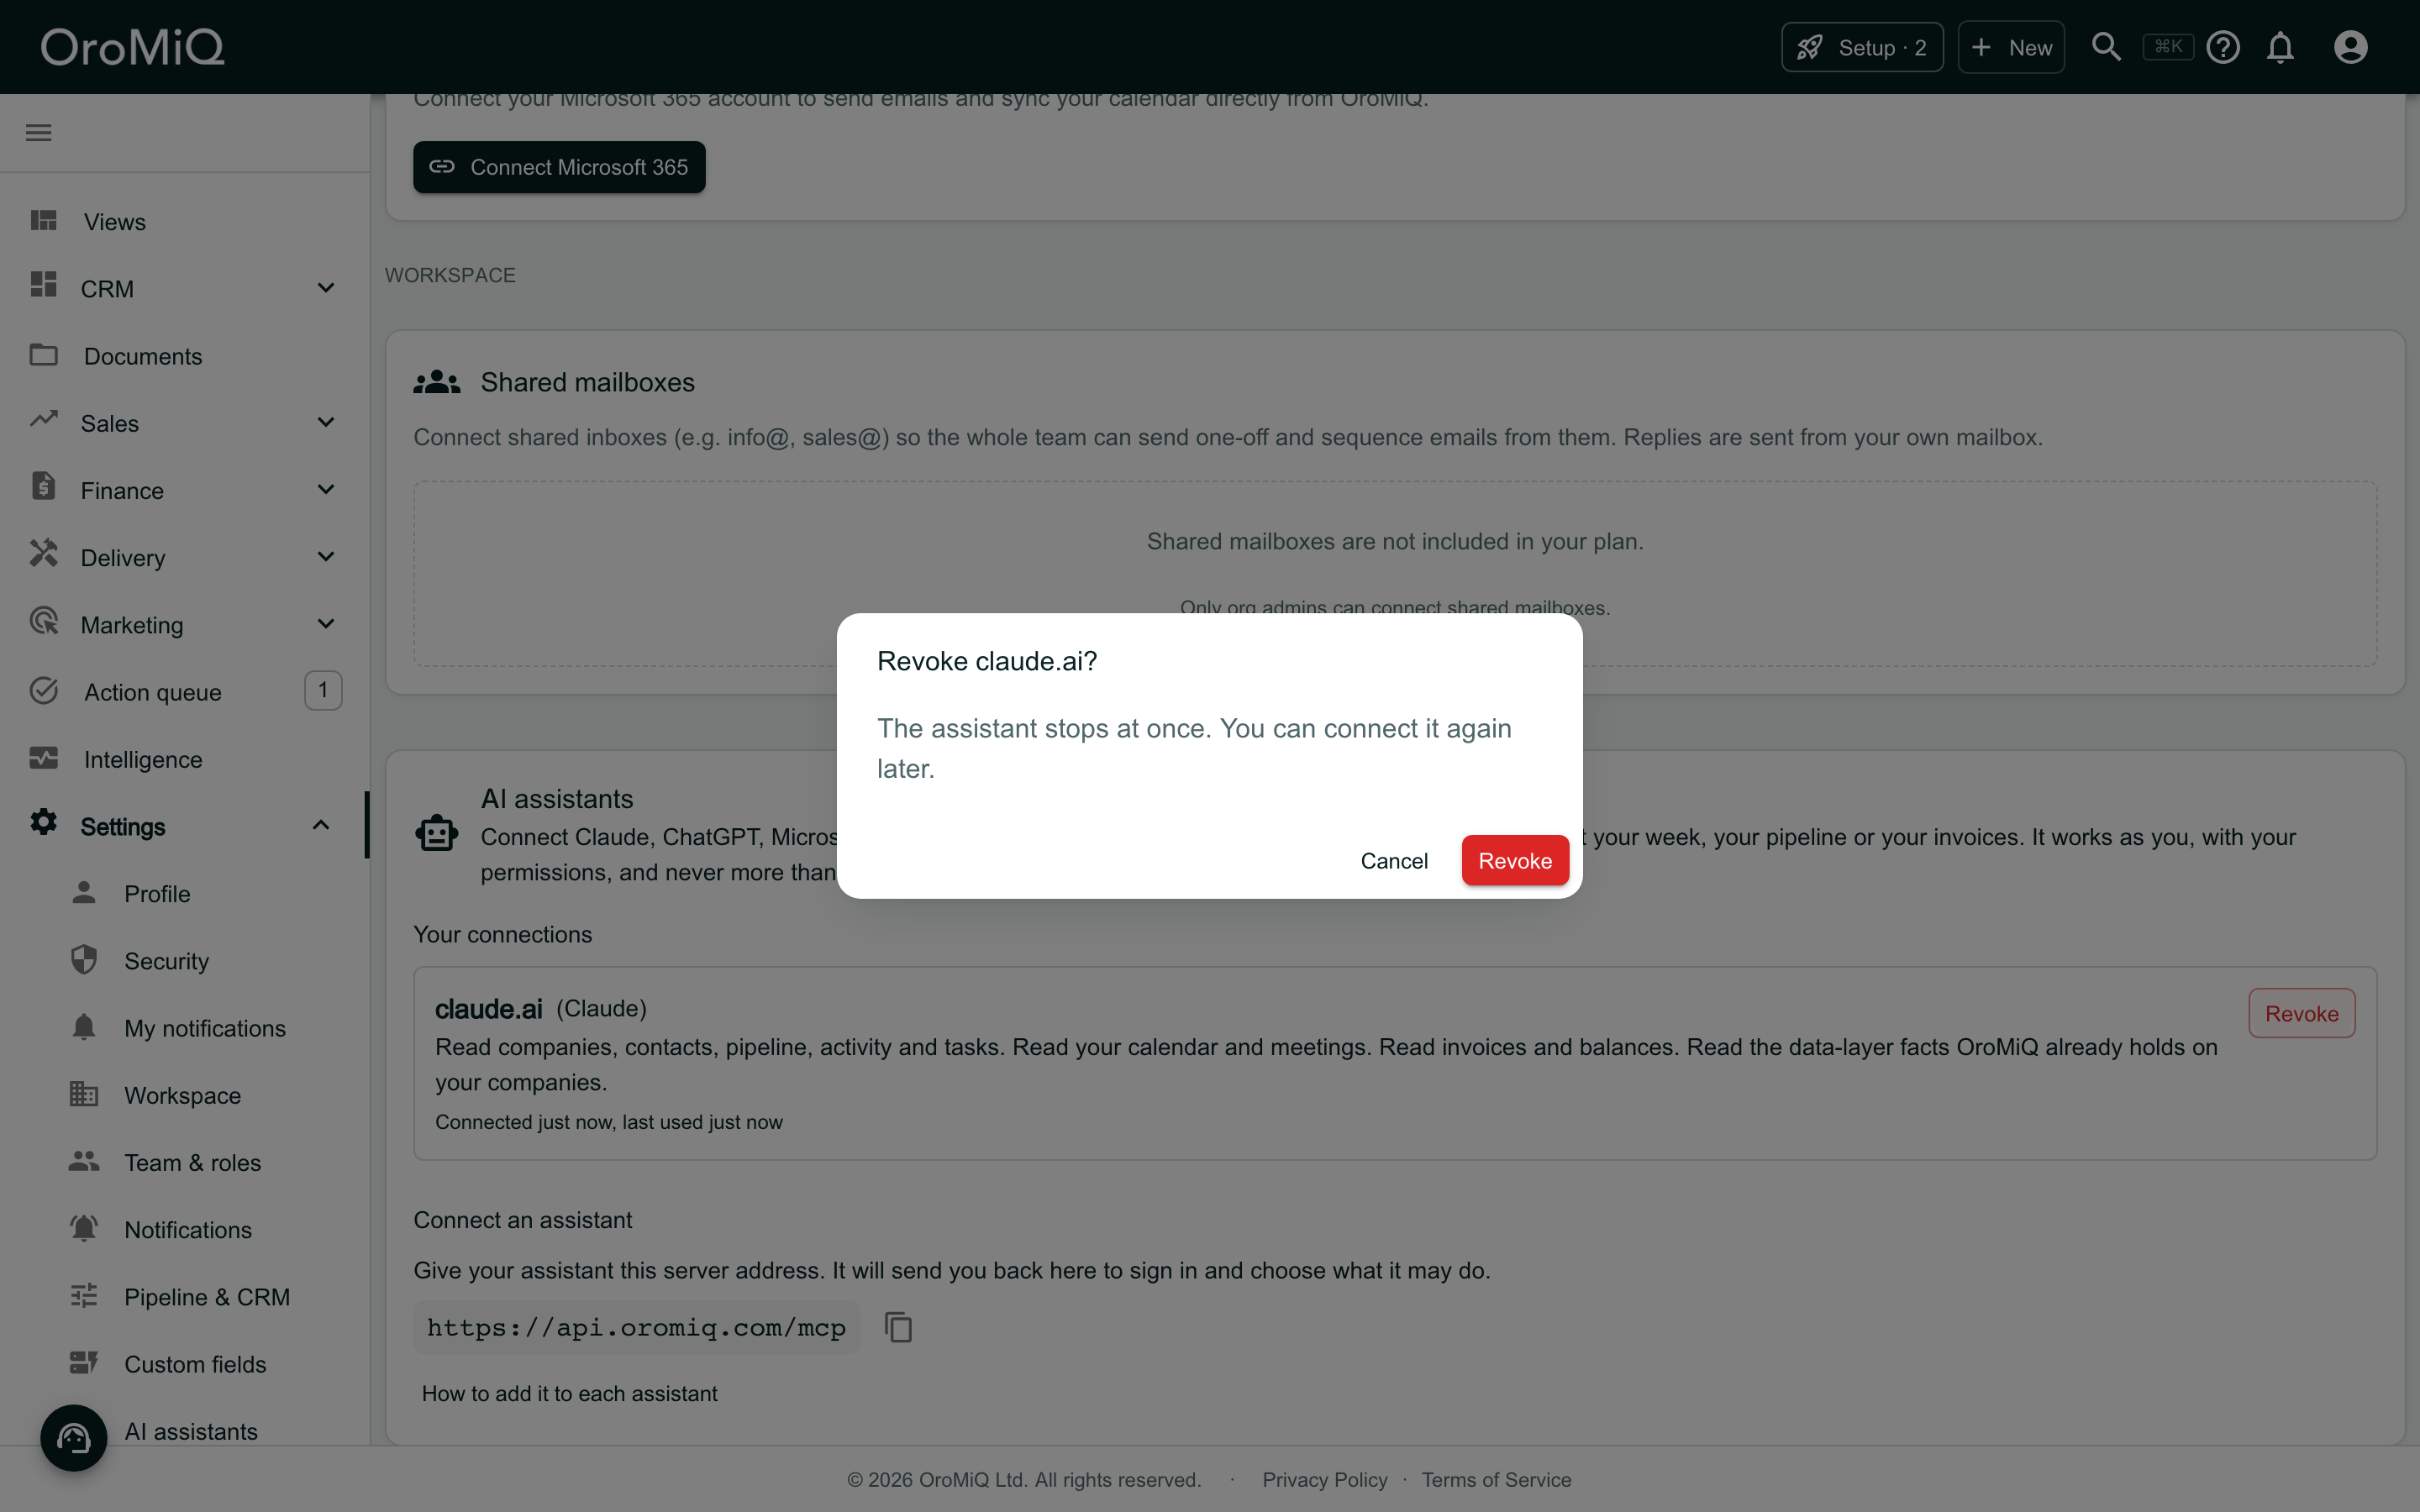
Back in Settings → Integrations, the AI assistants card lists each assistant you have connected under Your connections: its address, what it may do, when you connected it and when it was last used.
Revoke a connection
Click Revoke beside the connection, then Revoke again to confirm. The assistant stops at once. You can connect it again later by repeating these steps.
Note
Add OroMiQ to your assistant
The vendors’ own steps, as their help pages describe them today. Their screens change from time to time, so if a label has moved, their help page has the latest. Wherever you are asked for a URL, paste the server address from step 1.
Claude (web, desktop and mobile)
Custom connectors work on every Claude plan. On the Free plan you can add one.
On your own plan, such as Pro or Max, add it yourself:
- Go to Customize → Connectors, click + Add, then Add custom connector.
- Enter a name, such as OroMiQ, paste the server address and click Continue.
- Review the authentication settings Claude found and click Continue. Under OAuth client, keep Use Claude’s published identity (Recommended).
- Click Add, then sign in to OroMiQ when Claude asks.
On a Team or Enterprise plan, an Owner adds OroMiQ once for everyone, in Organization settings → Connectors: click Add, hover over Custom, select Web, and follow the same steps. Each team member then goes to Customize → Connectors, finds OroMiQ and clicks Connect, so Claude works with their own OroMiQ account.
To switch OroMiQ on or off in a chat, click the + button at the lower left of the chat, then Connectors.
Claude Code
In your terminal, run:
claude mcp add --transport http oromiq https://api.oromiq.com/mcpThen, in Claude Code, type /mcp and follow the steps in your browser to sign in.
ChatGPT
Whether you can add a custom server depends on your ChatGPT plan and your workspace’s settings. On a ChatGPT Business or Enterprise workspace, your ChatGPT admin decides who may create plugins with MCP servers, which uses developer mode. If you cannot see the option, ask them.
- Go to ChatGPT Plugins, select the plus button, then Add custom MCP server.
- Enter a name and a short description. Under Connection, paste the server address, including /mcp at the end.
- Set up the authentication, review the risk warning and select I understand and want to continue.
- Select Create as a plugin.
- Start a new conversation, type @ and pick OroMiQ. Sign in to OroMiQ when ChatGPT asks.
Microsoft 365 Copilot
Microsoft’s assistants reach OroMiQ through an agent built in Copilot Studio, so this is a job for whoever builds agents in your organisation, not something each person sets up. In Copilot Studio they:
- Open the agent’s Tools page, select Add a tool, then New tool, then Model Context Protocol.
- Fill in Server name, Server description and Server URL (the server address).
- Choose OAuth 2.0 as the authentication, with the type Dynamic discovery, then select Create and Next.
- On Add tool, create a new connection, then select Add to agent.
Each person who uses the agent signs in to OroMiQ with their own account the first time, so it works with their permissions. Your organisation’s Power Platform data policies also apply to MCP servers in Copilot Studio, so an admin may need to allow it. How the agent is then made available in Microsoft 365 Copilot depends on your organisation: ask your Microsoft 365 admin.
Other assistants
What next
Cannot find what you need? Browse the Help Centre or submit a support ticket.